Sunday 12 December 2010

Season of Joy Trees

I'm not sure if I've posted this one before, so if I have I'm sorry. I love the Season of Joy stamp set as it's so versatile. I've just used the tree in this card, but the set has lots of fab images & the swirl can be used all year round.

The DSP was the Bridesmaid foiled one that is sadly discontinued & I used my Cherry Cobbler ink pad to colour the areas that were not foiled. Love this effect.


Thanks for looking,
Kathy. x

Saturday 11 December 2010

Serene Dasher

I love the Dasher stamp & it works so well with Serene Snowflakes, the colour combo is Not Quite Navy, Bashful Blue & Whisper White with a little Platinum Shimmer Paint.

This card can be made in batches by making whole sheets of the pattern, then stamping the Dasher panels together.

Happy Crafting,
Kathy. x

Friday 10 December 2010

Soft Holly

Sorry the picture is a little blurry, but I hope you get the drift of the design.

I kept it simple with the tree to one side, with a little tearing & daubing the edges & the Soft Holly roller as a border.

Thanks for looking,
Kathy. x

Thursday 9 December 2010

Delightful Decorations Workshop

Some of my ladies came over & we made a couple of these cards each.

We started off with a 12" square piece of Very Vanilla Which we cut down to 2 5" strips. The card was scored at 5" then the long side was folded in half. A circle was cut out of the folded side to create the semi-circular apeture.

Next we roller stamped with the back panel with So Swirly in our choice of colour, & used the swirl from the Season of Joy set to stamp around the apeture (I tried using the So Swirly but the pattern was too busy).

2 panels were cut from matching colour card stock & punched the borders, they were adhered to the card as shown. A piece of ribbon was added to the front border and a piece of Elastic Cord was stuck into the crease to hold the ornament. The front panel was then stuck down to hide the ribbon & cord.

Finally we stamped & cut out 2 ornaments & stuck them on either side of the Elastic Cord.

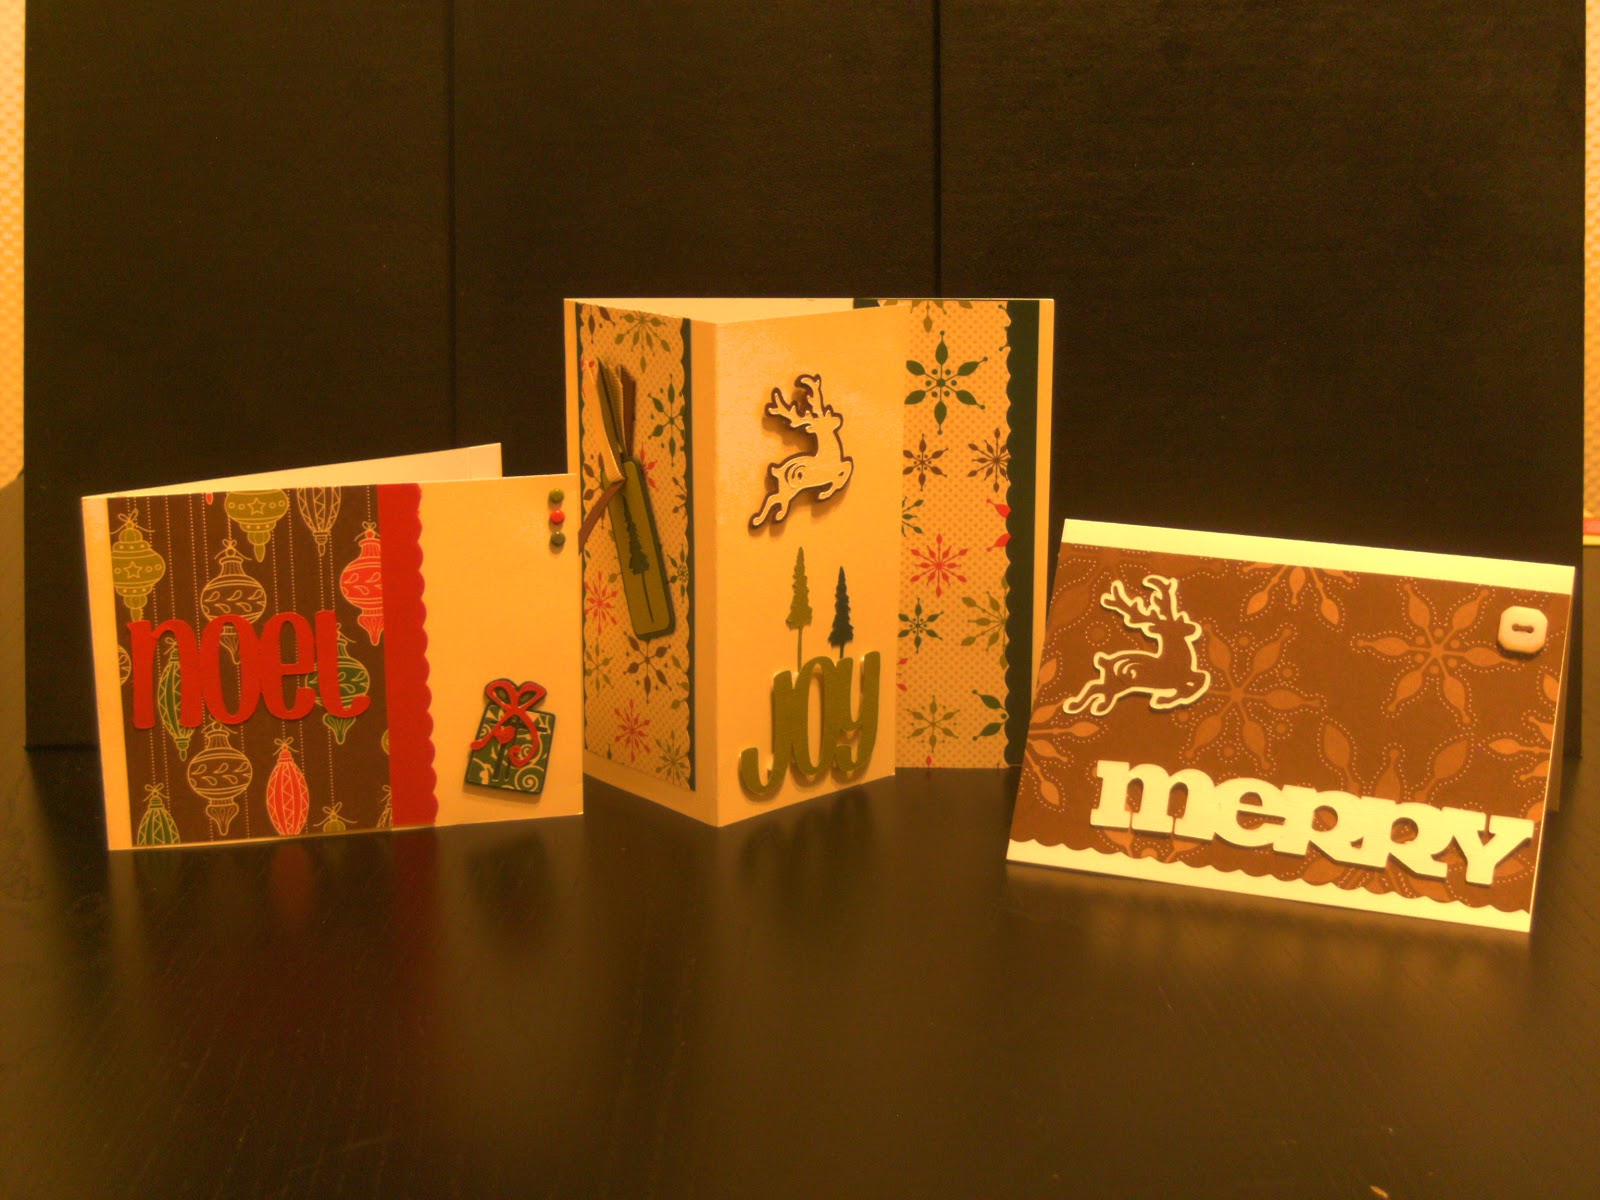
The ladies loved making these and as you can see, I've made a few! :)

Happy Crafting,
Kathy. x

Wednesday 8 December 2010

Baja Breeze Photo Frame


I have decorated this frame to give to my eldest sister for her birthday, her bedroom is decorated in this colour so I thought she'd like this to put on her dressing table.

I used a bare basics photo frame from Do Crafts (cost £1.09) and first covered the whole frame (back and front) with Whisper White Craft ink, using a sponge dauber. I let the ink dry then applied Baja Breeze ink, again using a sponge dauber. This gives a nice soft colour all over. I let the frame dry then used Craft Whisper White ink to stamp the base layer of the flowers & Baja Breeze for the top layer. The effect is very subtle, hope she likes it!

Thanks for looking,
Kathy. x

Monday 22 November 2010

Purple Christmas

Anyone who knows me knows I just can't leave the colour purple alone! I was so gutted when most of the purples were discontinued during the colour revolution, but at least we still have a couple, then came the in colour Concord Crush, yummy!

Take care,
Kathy.

Tuesday 16 November 2010

21 Again!

Happy Birthday Bro!

So that means happy birthday to me! He's my twin, obviously not identical ;) so I can rib him about being 21 times two!

This was a simple card of black, white & Platinum Shimmer Paint.
Stamps used were All in the Family, Just Perfect & San Serif alphabets.

Thanks for looking, take care,
Kathy. x

Monday 8 November 2010

Contempo Christmas Tree


This card was made with the unusual colour combination of Perfect Plum, Cajun Craze and Always Artichoke, it's not a combination I would have thought of myself, it came from my trusty Colour Coach. Doesn't it work well?

You might not be able to see from the photo, but I used the perforator from the Cutter Kit to give the Perfect Plum layer some interest.

Thanks for looking,
Kathy. x

Sunday 7 November 2010

Natural Contempo Christmas


This simple easel card show how lovely the baubles are, I didn't have the matching punch when it was made & I have to admit they are easy to cut out, but being very lazy I now have the punch! :)

The colour combinbation can be whatever you like, I chose colours from the Neutrals Collection as I was in that kind of mood, but I've since done some purple ones, no surprize there I hear you say! lol

Thanks for looking,
Kathy. x

Saturday 6 November 2010

Christmas Workshop - Four Cards in a NIght

This workshop showed how we can make a bunch of cards in 2 hours, just by being organised! If each stage is done separately, then all the cards put together in the end, we can get all our Christmas cards done in no time. Says me who is still struggling to get to 50, let alone the hundred I need. :)

All the stamped images were done first onto Whisper White card & cut & punched out where required. Next glue your layers, add brads, gems etc where needed. Score & fold your card blanks & finally stick everything together.

Still loving the Cherry Cobbler / Old Olive & Very Vanilla combination, I promise to show you some other combos soon.

Take care,
Kathy. x

Friday 5 November 2010

Word Cards Workshop

These cards were made at a workshop I held just using Merry Moments DSP (now retired) & shapes cut using my Cricut & Gypsy. I made the words on the Gypsy as it has a "Weld" function to stick whatever letters I choose together, this is perfect for personalised cards

The colour combination was Old Olive ,Garden Green, Real Red, Very Vanilla & Chocolate Chip.

We made about 50 cards that night & there was still loads of DSP left over, in fact we ran out of die cuts so I brought out the Christmas Jingle Simply Scrappin' Kit & they got stuck into that! Way to go ladies!! :)

Thanks for looking,
Kathy. x

Thursday 4 November 2010

Serene Snowflakes Noel


I'd planned to show the stamping technique for this card at my new catalogue launch party, but didn't get round to it, this card isn't really suitable for a workshop as it's quite fiddly & we'd be fighting for the same stamps all evening!

I stamped the letters in Crump Cake (the new name for Kraft) & then kiss stamped Serene Snowflakes over the top using Chocolate Chip, the letter were then stmaped onto Very Vanilla, circle punched & more snowflakes added all over in more Crumb Cake ink. I used the middle sized snowflake to make the "O" for added interest.

The background was just more snowflakes in Champagne Mist Shimmer paint, Crumb Cake & Chocolate Chip ink.

Thnaks for looking,
Kathy. x

Wednesday 3 November 2010

Medallion Christmas


My camera really isn't showing the colours well at the moment, but these were made using new Cherry Cobbler (a fab rich red), trusty Old Olive & Very Vanilla.

These were made at one of my many workshops I've been haing lately, they're so quick & easy to make, great if you're like me & have well over a hundred cards to make each year.

Happy crafting,
Kathy. x

Tuesday 2 November 2010

Baja Breeze Brocade

I haven't just been making Christmas cards lately, the new catalogue has brought us new stamps & new colours! This one is using Baja Breeze, Pink Pirouette & Early Espresso, I'm sorry the photo doesn't do it justice, trust me it's lovely.

I took the colourway from the new Colour Coach. This handy little item has all the colours on the front& some suggested colour combinations on the back. This is fabulous if, like me, you're afraid  to experiment with different colours. You'll find out that I've become a lot more daring, thanks the the Colour Coach.

Thanks for looking,
Kathy.

Monday 1 November 2010

Christmas Workshop

These cards were made at one of my christmas workshops I've been having lately. Just a few more to go, then it'll all be over! :)

Tthe centre card was made using my new toy, the Cricut die cutting machine. I just love my new gizmo! I can set it to cut a whole sheet of shapes while I do something else, saving me loads of time. I also have the Gypsy, which is great for designing while I'm on my lunch break at work, or sat in front of the telly keeping my long suffering hubby company.

Anyway, we made these three cards, it was a lovely evening having fun crafting with friends, what could be better?

Happy crafting,
Kathy. x

Sunday 31 October 2010

Black & White Workshop

On the same night we showed off our challenge cards, we made these two cards.
I'd gone all monochromatic that night, sometimes I find it easier to go that way, it saves me having to think up a colour scheme!

The lovely church was from the now retired Silent Night set, you might be able to see from the photo that we decoupaged the church & added an acetate "bubble" stamped with Serene Snowflakes to protect the layers.

The other card used the Night & Day DSP, also retired. I punched out two scalloped circles, cut into the centre of each & concertina folded them to create the flower, punched flowers & a brad covers the messy centre. This flower was inspired by the ones in the new Idea Book & Catalogue. I love the sentiment from the Occassional Quotes (Hostess Level 3) set, it just finished the card off nicely!

Take care,
Kathy. x

Saturday 30 October 2010

Black & White Challenge

A while ago I challenged my Stampers 6 ladies to create some cards using some images I'd stamped onto some Whisper White card, together with some Basic Black card & an Eyelet Border strip.

They came up with some lovely cards (sorry I forgot to take pictures) & I completed these cards to show what I'd have come up with.

The stamp set I used was True Friend, which has now retired, but any stamp set would have made a lovely set to give as a gift.

Thanks for looking,
Kathy.

Saturday 16 October 2010

Tealight Holder Cover


I made this cover for a tealight holder I bought a while ago, I used the snowflake rub ons from the mini catalogue (now sadly retired). I'm not sure about this one, I think I'm going to have a rethink & try again, what do you think? Any suggestions would be greatly appreciated!

Take care,
Kathy. x

Friday 15 October 2010

Sparkly & Bright Lantern

This is a cute little project I made after I bought a load of battery operated tea lights. The holer is made from the Vellum Card (it's nice & sturdy). I stamped & embossed in white then used my trusty Stampin' Write markers to colour in the back. It's a bit fiddly to put the holder together, but my son loved it!

I did another one in blue & lilac, but can't find the photo! Oh well, I can always make another! :)

Kathy. x

Thursday 14 October 2010

Serene Snowflakes Card Set


Yet another set, this time in a natural colour way.
I also like to decorate my envelopes, and the Serene Snowflakes stamp set is ideal for this


Thanks for looking,
Kathy. x

Wednesday 13 October 2010

Snow Burst Card Set


This is another set I made a while ago, I've posted it all in one go as I have so many projects to show you. This set was super easy to make, I was finished in one evening. It's just as well when I have well over a hundred cards to make this year.


Take care,
Kathy. x

Tuesday 12 October 2010

Sparkly & Bright cards 4, 5 & 6!


Blogger has finally let me upload some photos, so here are the remaining cards from the Sparkly & Bright set. Sorry it took so long.

Lots more to show you, so come back soon!
Kathy. x

Monday 11 October 2010

Thank you!

Just a little note to say THANK YOU to the lovely ladies who came to my New Catalogue Launch Party. 
I had a lovely day chatting, stamping & eating cake, hope you did too!

I thought I'd better announce the winner of my prize draw, who has won lots of Stampin' Up goodies. My husband Pete drew the ticket so....
Congratulations Doreen!

As you know I've been having a lot of trouble getting to post my blogs lately, but I promise I have loads to show you & will endeavour to have some new projects very soon.

Take care,
Kathy.
x

Sunday 26 September 2010

Hi All!!

Sorry I haven't posted in a while but Blogger is being a pain & only letting me in for a short while & not letting me upload my photos. This is just a quick post (before Blogger chucks me out) to let you know about my: 


New catalogue Launch Party
at my home on
Friday the 1st of October 
from 10am 'til 4pm 
& then 
from 7.30 'til 9.30pm

  • Be one of the first to see the new catalogue 
  • Try some of the fab new products
  • Demonstrations
  • Lots of make & takes
  • Prize Raffle
  • Light refreshments provided
Some of my lovely stampers six ladies will be assisting me throughout the day (don't know what I'd do without them) so if you are interested, please contact me for details & directions:

01726 63461 (evenings) or
email pete.jsimpson@talktalk.net

What could be better, a day full of crafting, fun & laughter? I would love to see you there.

Take care,
Kathy.
x


Friday 10 September 2010

Sparkly & Bright Set Card #3

For card number three I used a round post-it note to mask of the panel, then stamped the sparkles all over, you could use the roller again, but be careful around the post-it, you don't want it to move while you're stamping. To give the citcle more definition I used a Stampin' Write marker to go around the post-it, this needs a steady hand!

Thanks for looking,
Kathy.

Thursday 9 September 2010

Sparkly & Bright Set Card #2

Card number 2 uses quite a large panel of the background, but if you want your card to go further, just use a smaller piece.

The jolly Santa only fits in the 1-3/4" circle punch, so I punched the scallop circle twice and put them either side of the circle.

I won't bore you with the supplies list, I'm sure you get my drift from the last post!

Happy Crafting,
Kathy.

Wednesday 8 September 2010

Sparkly and Bright Set Card #1


This is the first of the cards I made to go inside the Sparkly & Bright gift bag, which I posted yesterday. Hopefully this card set will show how versatile the stamp set is, apart from being very cute!


Supplies:
  • Stamps - Sparkly & Bright
  • Ink - Night of Navy, Certainly Cerlery
  • Accessories - Dazzling Diamonds
  • Tools - Paper Cutter, Paper Snips, Scallop edge, Scallop Circle & 1-3/8" Circle punches, Aqua Painter
  • Adhesives - Snail, Dimensionals, 2-Way Glue Pen
Please note I haven't listed what I used for the background card, please see my post for the gift bag which takes you through the process step-by-step.


Thanks for looking,
Kathy.

Tuesday 7 September 2010

Sparkly & Bright Set - Bag


This bag is the first part of a set I made after making some background card:
  • I first used my sponge daubers to make splodges of colour all over a piece of A4 Whisper White card.
  • I then used Versamark in my roller & used it all over the card. 
  • Next heat emboss using clear embossing powder.
  • Finally cover the whole of the card with a dark colour using a brayer, the clear embossing resists the ink to give you multi-coloured sparkles. 
Supplies for background:
  • Stamps - Jolly roller
  • Ink - Versamark, Night of Navy, Certainly Celery, Pretty in Pink, Bashful Blue
  • Card - Whisper White
  • Accessories - Clear Stampin' Emboss Powder
  • Tools - Brayer, Heat Tool, Sponge Dauber
    I use a bit of kitchen towel all over the card to get excess ink off, leave it to dry for a bit, then it's ready to use. One A4 sheet made this bag, six cards, with a little left over, so it's a simple way of getting a few cards done.
    Thanks for looking,
    Kathy.

    Sunday 5 September 2010

    Rich Razzleberry Set Card #6

    The last card had to be a get well card. I don't know about you, but when I've been under the weather a get well card is an instant lift. It might not get me better sooner, but is brings a smile to my face for a while. I send a lot of these cards, and I hope they give the recipients the same feeling as I get.

    Supplies:

    • Stamps - Baroque Motifs, Sincere Salutations
    • Ink - Rich Razzleberry
    • Card - Whisper White, Old Olive, Rich Razzleberry
    • Accessories - Old Olive Brad (from Earth Elements set)
    • Tools - Paper Cutter, Paper Snips, 2-Step Bird punch (for leaves), 5 Petal Flower Punch, Boho Blossoms Punch, 1/2" Circle punch, 1/16" Circle Handheld Punch
    • Adhesives - Snail, Dimensionals, Mini Glue Dots.
    PS. Do you like the flower? I made it by punching the 5 Petal Flower punch 3 times then crumpling (without ripping) it. You could use a distress embossing folder/texture plate in your die-cutting machine, but this gets the fibres of the card to separate into layers. I also distressed some Old Olive card before punching out the leaves, but make sure the punch is clear of off cuts before using again as they could damage you precious punch.

    Thanks for looking!
    Kathy.

    Saturday 4 September 2010

    Rich Razzleberry Set Card #5

    I generally have at least one wedding card to send each year, so I included one in the set. Love the wedding shoes! The border was an off cut of ribbon, don't throw your bits away!

    Supplies:
    • Stamps - All for Friends (Hostess), Curvy Verses, Framed with Love
    • Ink - Rich Razzleberry
    • Card - Rich Razzleberry, Whisper White
    • Accessories - Rich Razzleberry Polka Dot Ribbon
    • Tools - Paper Cutter, Sponge Dauber, Scallop Oval Punch
    • Adhesives - Snail, Dimensionals
    Thanks for looking!
    Kathy.

    Friday 3 September 2010

    Rich Razzleberry Set Card #4

    Card number 4 is another quick one, I stamped the flowers from the Pretties Kit with Rich Razzleberry ink & the Fine Flourish stamp, added a bit of bling with a Rhinestone brad (also from the Pretties Kit).

    You might think the Pretties Kit is expensive, but you get loads in it! The are 50 flowers to start with, which you can colour with your inks or markers or stamp on them as I have done here. The 50 clear Rhinestone brads add the sparkle, together with pearls for elegance & beads galore. This kit will make your creations stand out from the rest. And when you've finished with the contents, use the tin for storage or as a gift box.

    Supplies:
    •  Stamps - Fine Flourish, Sincere Salutations, Framed with Love
    • Ink - Rich Razzleberry
    • Card - Rich Razzleberry, Whisper White
    • Accessories - Flower & Brad from Pretties Kit
    • Tools - Paper Cutter, Eyelet Border Punch
    • Adhesives - Snail, Mini Glue Dots, Dimensionals
     Thanks for looking,
    Kathy.

    Thursday 2 September 2010

    Rich Razzleverry Set Card #3

    Card number 3 was made using the off cuts of DSP from the box, I don't waste a thing! I used a thin strip on the envelope too, make sure it's well stuck down if you're sending the card in the post.

    I teamed the paper with an image from the Level 2 Hostess Set from the mini catalogue. This set has a number of images that fit so many occassions, but if you want it you'd better hurry, the set is only available until the end of this month if you hold a qualifying party, so contact me now!

    Supplies:
    • Stamps - All for Friends (Hostess), Basic Phrases
    • Ink - Rich Razzleberry
    • Card - Whisper White, Rich Razzleberry
    • DSP - Cottage Wall
    • Tools - Paper Cutter, Corner Rounder Punch, Scallop Oval Punch, Oval Punch, Aqua Painter
    Happy Crafting!
    Kathy.

    Wednesday 1 September 2010

    Rich Razzleberry Card #2

    Card number 2 is a generic card and the Vintage Vogue stamp set is perfect for any occasion. I hope the Old Olive Satin Ribbon carries over to the next catalogue as I love it!

    I should find out soon as the retired list comes out later today. I'll try and post the list here (if I can get the link right) if I can't it will be on the link to Stampin' Up's website on the right.

    Supplies:
    • Stamps - Vintage Vogue
    • Ink - Rich Razzleberry, Old Olive
    • Card - Whisper White, Rich Razzleberry
    • Assessories - Old Olive Satin Ribbon, Old olive Brad (from Earth Elements set)
    • Tools - Paper Cutter, Paper Snips, 1-1/16" Handheld Circle Punch
    • Adhesives - Snail, Dimensional
    Thanks for looking,
    Kathy.

    Tuesday 31 August 2010

    Razzleberry Card Set #1


    The first card I made to go in the box was a Christmas card, purely because I'm in that mode at the moment. I kept it nice & simple & used the gorgoeus Icicle Rub Ons from the mini catalogue. I also decorated the envelope to match using the Serene Snowflakes set.

    I've used other rub ons before & always struggled to get the image to transfer, not with Stampin' Up's, the images transferred so easily. The pack comes with one sheet each of white and silver. I've since bought a few packs of these to decorate other items as my Christmas colour scheme is blue, white and silver, perfect!

    Supplies:
    • Stamps - Dasher, Sincere Salutations, Serene Snowflakes
    • Ink - Rich Razzleberry, Versamark
    • Card - Rich Razzleberry, Whisper White
    • Accessories - Icicle Rub Ons, White Embossing Powder
    • Tools - Paper Cutter, Paper Snips, 1/2" Circle Punch, Scallop Oval Punch, Heat Tool,
    One down, several more to go!
    Kathy. x

    Monday 30 August 2010

    Razzleberry Card Organiser


    This started out as an A5 file which I covered in Rich Razzleberry Card. I decorated it with the gorgeous Cottage Wall Designer Series Paper & the Rich Razzleberry Polka Dot Ribbon, which are only available while stocks last.

    Supplies:
    • Stamps - None
    • Ink - None
    • Card - Rich Razzleberry
    • DSP - Cottage Wall
    • Accessories - Rich Razzleberry Polka Dot Grosgrain Ribbon
    • Tools - Paper Cutter, Paper Snips
    • Other - Lots of measuring & patience as it's very fiddly around the clasp.

    I plan to do a few of these & give them as gifts at Christmas, filled with a few of my creations. I've made the cards for this gift & I'll be posting them during the next few days. Warning, you may be fed up with Rich Razzleberry at the end of it!

    Happy Crafting!
    Kathy.

    Saturday 28 August 2010

    Dashing Through the Snow #1


    I made this card for the team training Abi held last month (I know it was July but I have to start early). I have fallen in love with Dasher & I'm sure he's going to be making several appearances on this blog before he takes a holiday on the 26th December.

    I made my own background card using the goreous Serene Snowflakes set with Soft Suede, Chocolate Chip & Whisper White inks & Champagne Mist Shimmer Paint. The fancy greeting shape was made using the Punches Three Hostess set where I punches it out with the Scallop Square punch & then used my trusty Paper Snips to cut out the greeting.

    Don't forget that the Punches Three set is only available until the end of September when the current catalogue ends, so if you would like to earn this set, contact me. I tailor home workshops to your requirements so contact me to arrange an evening of fun & creativity!

    Supplies:
    • Stamps - Dasher, Serene Snowflakes, Punches Three (Hostess)
    • Ink - Soft Suede, Chocolate Chip, Whisper White Craft
    • Card - Very Vanilla, Soft Suede, Chocolate Chip
    • Accessories - Champange Mist Shiimer Paint
    • Tools - Paper Cutter, Paper Snips, Scallop Square punch, Scallop Oval punch
    • Adhesives - Snail, Dimensionals
    Thanks for looking,
    Kathy.

    Thursday 26 August 2010

    Twilight Cards


    These cards were made using some images very kindly sent to me by Amanda, another of Abi's downline. For those of you who are not Twilight fans, they are images of the two main characters from the books/movies: Edward & Bella.

    I coloured in the images with some Promarkers & mounted them onto Sweet Pea Designer Series Paper & card with Martha Stewart punched edges. A few punched flowers & leaves finishes them off.

    Thanks for sending them to me Amanda, a little thankyou is in the post, sorry it wasn't posted earlier.
    Kathy.
    x

    Wednesday 18 August 2010

    Team Challenge - Brayered Tree


    I bought myself a brayer a long time ago & have finally got the hang of it!
    This card was for my upline, Abi's, challenge, the theme was Christmas so here's what I came up with, sorry it's late but Blogger hasn't been letting me upload lately, & I have loads to show you!

    Maybe I'll be able to post some more while I'm on leave from work, fingers crossed.

    Supplies:
    • Stamps - Lovely as a Tree, Tiny Tags
    • Ink - Ballet Blue, Night of Navy
    • Card - Whisper White, Night of Navy
    • Accessories - Whisper White Satin Ribbon, Silver Elastic Cord
    • Tools - Brayer,  Jewelery Tag punch, 1/16" handheld punch, Paper Cutter
    • Adhesives - Snail
    Check out Abi's other downline, the links are on the right of my blog, they're fab!

    Thanks for looking!
    Kathy.

    Monday 9 August 2010

    Playful Petals Class


    These cards were made at my last monthly class, we used the lovely Playful Petals stamp set, together with the matching Tea Party Paper (retiring this year) & watercolouring with inks.

    Supplies:
    • Stamps - Playful Petals, Oval All
    • Ink - Basic Grey, Soft Subtles Refill Inks
    • Card - Assorted Soft Subtles & Confetti White
    • Accessories - Pretty in Pink Taffeta Ribbon
    • Tools - Papers Cutter, Paper Snips, 1-1/4" & 3/4" circle, Oval & Scallop Oval Punches
    • Adhesives - Snail & dimensionals
    It was surprising how many shades of the same colour you can acheive with the inks, some cards came out very vibrant, other very subtle. I really enjoyed the class, and I think my ladies did too!

    Thanks for looking,
    Kathy.