Showing posts with label Scallop Envelope. Show all posts

Thursday, 18 August 2011

Sweet and Sour Blossoms Workshop


Here are some pictures of the Sweet and Sour workshop I held a few weeks ago. My ladies loved making the flowers using the Build a Blossom stamp set and matching Blossom Petals punch.

I like to get my bone folder out to curl the petals, it makes them look more realistic. My top tip would be to start with a punched circle of card as your base, then build up the flower, petal by petal, layer by layer.

We made the card and gift purse, together with a bookmark (but I can't find mine), but had some time left, so we made some more flowers to put on other projects. The last picture shows what some of us came up with, using the same ink, stamp and punch, pretty!

Several of my ladies now have either the stamp set, punch or both, I can't wait to see what creations they come up with!

I was stalking the US demo's sites during their convention and found some gorgeous roses made with the punch, scroll down to my last post to see what I came up with.

Thanks for looking,
Kathy x


Saturday, 13 August 2011

Scallop Envelope Purse


Sorry about the blurry picture, but I'm sure you get the drift of this little bag.

This was made using 2 Scallop Envelopes with the bottom flap cut down to the same width as the sides. Punch out the handle with the smallest oval punch then a little Sticky Strip and it's done!

I decorated it with some Greenhouse Gala DSP, die cut a tag, punched a large oval then added leaves and flower. I think this would make a lovely wedding favour.

Thanks for looking,
Kathy x


Thursday, 7 July 2011

Black and White Daisies


I told you I'd make an envelope with the die!! Okay, I put it on a card, but it's still an envelope!

A very simple idea, the envelope opens to reveal the greeting (Hostess Level 2 set - Afterthoughts) and I added a large flower embellishment with the Sizzix Daisies #2 die cut from printed acetate (retired) and Whisper White card.

I stamped around the greeting, inside the card and on the envelope with the Greenhouse Garden daisy stamp.

Thanks for looking,
Kathy x.


Sunday, 3 July 2011

Scallop Envelope Box #3


One day I'll actually make an envelope from this die!! But for now here's another basket!!

Happy crafting!
Kathy x.

Friday, 1 July 2011

Scallop Envelope Basket #2


Here's another Scallop Envelope bakset, this time embossed with the Square Lattice embossing folder to give a basket weave effect. I filled it with a glass tealight holder & some Vanilla scented tealights which I topped with some matching DSP.

Hope you like it, take care,
Kathy x.


Friday, 24 June 2011

Scallop Envelope Box


When I made this box I'd made a mistake, but turned it around to make a lovely gift. I was busy making Scallop Envelope baskets, when I put the DSP on the wrong side! Ooops!
Rather than the sides folding outwards, I folded them in and tied some ribbon round to keep it together. Hiding inside are 4 bath bombs but you could put chocolates, jewelry or anything small inside.

Thanks for looking,
Kathy x.

Wednesday, 20 April 2011

Beautiful Butterflies Workshop


My ladies will be making these projects this week, plus another but I haven't decided what that will be yet!!

The card shows just how lovely the Elegant Flowers embossing folder is, I've only added a few Beautiful Wings embosslet butterflies and coloured in the flower centres. The Four Frames has come out again, I just can't leave it alone!

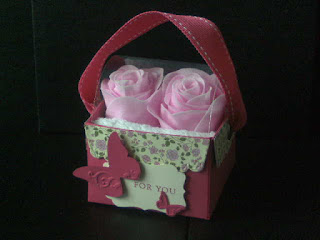
The box was made from the Scallop Envelope die, cut 4 envelopes and use Sticky Strip to stick them all together. There's a tutorial on You Tube here for a similar one, which is where I got the idea from. I've used some of the gorgeous Springtime Vintage DSP for the flaps for added interest and finished off with some more butterflies.

The box holds a nice soft flannel and 2 bathing roses which smell devine, and I added some acetate to the top to protect the contents.

I hope my ladies enjoy making these items, now I've just got to figure out what else for them to make!

Thanks for looking,
Kathy. x

P.S. I've now decided what the third project will be, but will hopefully post it tomorrow as I can't find the camera!