Monday 12 September 2011

Serene Razzleberry Snowflakes #3


I think this one was the easiest of them all, four equal size panels and a greeting banner. You could make just this type from your A4 sheet and it would take you next to no time.

Thankd for looking,
Kathy x


Saturday 10 September 2011

Serene Razzleberry Snowflakes #2

Here's another card, using the other triangle panel from card number 1.

This time I made a flower and used the Decorative Label Punch for the greeting. The backing for the greeting was two punched panels which I then cut in half, one lengthways and one widthways.

Another easy peasy card, I'll show you another one next time (hope you don't get bored with them).

Take care,
Kathy x

Thursday 8 September 2011

Serene Razzleberry Snowflakes #1


Having loved the card I made last week, I had to make some more! This time I took an A4 sheet of Very Vanilla cardstock and stamped the Serene Snowflakes all over in Rich Razzleberry, Pretty in Pink, Early Espresso and finally Champagne Mist Glimmer Paint.

I then cut several panels out of the sheet. This technique is called "One Sheet Wonder" as you use a whole sheet of patterned paper (home made or DSP) and make a stack of cards. This is great if, like me, you have loads of cards to make.

I started off with an Early Espresso card base, I cut a triangular panel and a star, layered them onto Rich Razzleberry CS and added a snip of Rich Razzleberry Striped ribbon. I then added the greeting banner. I used a square punch to cut the ends of the banner, layering it on Early Espresso then Rich Razzleberry.

The star was finished off with a button, once you've done the pattered paper it's amazing how quickly you can make this card.

Thanks for looking,
Kathy x

Tuesday 6 September 2011

Razzleberry Snowflakes


Once I received the free gift that was available last month I just had to use some of the gorgeous ribbon!


I started off with a card base of Rich Razzleberry, a panel of Early Espresso, then a smaller panel of Very Vanilla.

The Very Vanilla panel was first stamped with the saying (or could be a greeting), then I got busy with the snowflakes! Rich Razzleberry ink is a lovely strong colour, but you can get several shades of the colour by "stamping off" onto scrap paper before your project to get the lighter shade. This is what I did with the Rich Razzleberry and Early Espresso inks, together with Pretty in Pink. I also used some Champagne Mist Shimmer Paint for just a hint of sparkle.

All that was needed was a lovely big bow!

I'm going to be making more of these in loads of other colours, they're so easy.

Thanks for looking,
Kathy x.


Sunday 4 September 2011

Post-it Note & Label Holder #1


Another little gift idea, the colour combo was taken from the printed post-it notes and labels I found in "The Works" stationery shop. I used Peach Parfait, Blushing Bride and Wild Wasabi.

I used the dimensions of the post-its and labels to determine the size (the labels work out a little wider by the way). I can get three of these holders from an A4 piece of card, so they're great for craft fayres.

You can decorate them anyway you like, I chose a punched and layered flower and a nice saying (check it out, so true!).

Thanks for looking,
Kathy x.

Friday 2 September 2011

Button Trees #2


Here's what I came up with, not that much different than the last one!! This one is much smaller, trust me on that! We only had to cut four lots of buttons each not eight!

I made mine in two colours (Elegant Eggplant and Early Espresso) but my ladies only made the purple one. They loved making them and I'm sure they will be making a few more in future.

My thanks have to go to the Artistic Avenger who came up with the idea, check out her blog on the left, she has the most gorgeous projects on there.

And thanks again to my ladies, another lovely evening of craft, what could be better!
Kathy x.


Thursday 1 September 2011

Time to Say Goodbye.......

No not to me, You can't get rid of me that easily! 

No, the list of  products that are retiring is out today. For those of you who don't know, Stampin' Up! release their new catalogue next month (yippee) and they need to make room for new goodies, this means that some products are only available while stocks last or until 30th September (which ever comes first).

You can access the retired list here, which is updated daily.

Some lovely sets are retiring, and while I'll be sorry to see them go, the new catalogue has some fabulous items (my wish list is a mile long). If you would like a copy of the new catalogue at only £5 posted to your door, please email me at pete.jsimpson@talktalk.net asap.

Take care,
Kathy x

Tuesday 30 August 2011

Button Tree #1


I made this card after I saw a similar tree made by the Artistic Avenger here. I loved it so much I had to make one for myself!

I started off with a triangle of card, then used my trusty Sweet Buttons embosslit to cut out loads of those gorgeous buttons. I started using the largest buttons first, then worked my way down the sizes, filling in the gaps until the whole triangle was filled. I then cut a trunk out (just a rectangle) and added a ribbon bow made with a large brad.

The card was made up with a Top Note die cut, embossed with the Vintage Wallpaper folder, some swirls cut from a Sizzlit I have. The Swirls Scribbles Sizzlit would work great but I don't have that one, yet! I stuck the tree on top of the Tope note panel, then finished off with a greeting.

I was going to then make a demo out of it for my ladies as I knew they'd love it, but I decided to go smaller for them as I realised we'd be there all night just cutting buttons! lol

So, check out my next post in a couple of days to see what we made.

Thanks for looking,
Kathy x.


Sunday 28 August 2011

Mini Milk Carton Hexagon Box with Rose


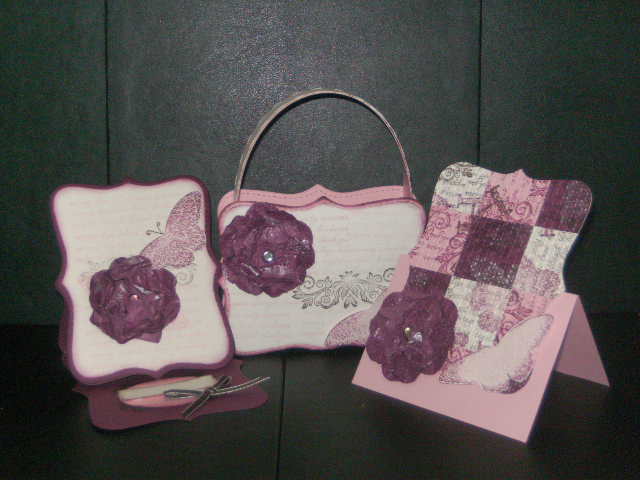
Here's a gift box my ladies made a few weeks ago at one of my workshops, it was made using the Mini Milk Carton die! It's amazing what you can make with Stampin' Up! dies, they're so versatile.

We made this box in two parts as I wanted it to have a lid so I could top it off with a rose.

There are tutorials out there in blogland which show you how to make this box and a few others using this die. I found a very helpful one on the Splitcoast Stampers site (link on the left). You'll need to go to the  "Anything but a card" section.

Basically you need to cut 2 Mini Milk Cartons, but with only three panels, not four and put the sides together, then the base. I strengthened the base with a large punched circle of card. There is a little scoring involved in getting the top to fold right, but once you've done it once, it's easy. What you need to do is score the top middle panel the same as the other two, then it folds correctly.

To get a lidded box you'll need to cut 2 bases and 2 tops, but remember to make up the top a little bigger so it will fit, a couple of millimetres should do it.

Hope you like this project, and have a go at making one yourself. If you don't own the die, why not contact me to order it, you'll soon have lots of these cut little gift boxes to fill with chocolates, jewelery or other small gifts.

Take care,
Kathy. x

Friday 26 August 2011

Botanical Gazette Card #1


I made this card after getting the Botanical Gazette papers and Clearly for You stamp set and wondering what on earth to do with it!

I'm not very comfortable with the vintage look. I always struggle to get it right, aged but not completely ruined! I think I got it just about right this time, what do you think? Maybe a little more sponging on the red panels?

After stamping the images onto Very Vanilla CS and some of the DSP, I then gor the Sponge Daubers and Colour Spritzer Tool out. I didn't distress the edges of the paper because of the way the card folds, I thought they would catch and possibly tear when opened and closed.

Thanks for looking,
Kathy x.

Wednesday 24 August 2011

Daisy Card and Pillow Box


Here are the other projects my Stampers 6 Group made once we had made our quick cards.

I got the colour combo of Perfect Plum, Wild Wasabi and So Saffron from my trusty Colour Coach, not a combo I would normally go for but the Colour Coach works as usual.

We die cut 3 daisies at a time (the large and middle sized on the die) and sponged them with Perfect Plum ink, this gives them dimension and they look more realistic. A button was added to the centres to hide the hole in the middle. The rest was easy to put together.

Take care,
Kathy x.


Monday 22 August 2011

Cats and Dogs


At the last Stampers 6 group meeting I decided we do a couple of simple but effective cards before the main event. So here's what I came up with. I had a Sizzix Movers and Shapers die that cut the card and apeture, but you could punch out a square just as easily.

We rollered the P is for Paw roller along the bottom and added greetings to the card bases. Next I had a scrap of CS which I stamped the cat and the dog on and punched them out with the smaller square punch. I adhered them onto larger squares of Early Espresso, stuck them to the inside of the cards, using the apeture as a guide.

They took only a few minutes to make and the stamp set we used is so versatile, it has loads of different images for all occasions. I bought it clear mount and there are so many it came in 2 cases! A great value set I know I'm going to be using alot. Great for children to use too, as they are fun images that are simple to colour in.

Thanks for looking,
Kathy x.


Saturday 20 August 2011

Printed Petals Workshop


What fun we had with the Printed Petals stamp set and matching roller Petite Petals. We started the evening off by making the top card, a simple stepper card that even I can do (and now my ladies can do too).

We then moved on to the chocolate, none of us ate it (though I was tempted to open one bar so we could sample it!). We wrapped it up beautifully, this makes a 5 for £1.29 bar look so much more than it is.

Next I challenged everyone to make a similar card to the first, but to do thier own thing and here's what we came up with. Mine is the first, the rest are my ladies', they came up trumps with some lovely designs. Well done ladies!!

You might have noticed that a rollered some Very Vanilla to make a border, but it's in Pretty in Pink and Rich Razzleberry. This is because I purchased an uninked cartridge, but it's sponge was in 2 halves. I decided to ink each half in 2 very different colours, You can buy 3 cell cartridges that you can ink in whatever combination you want, but this was an unexpected bonus!!

Thanks for another great night ladies!!

Take care,
Kathy x.

Thursday 18 August 2011

Sweet and Sour Blossoms Workshop


Here are some pictures of the Sweet and Sour workshop I held a few weeks ago. My ladies loved making the flowers using the Build a Blossom stamp set and matching Blossom Petals punch.

I like to get my bone folder out to curl the petals, it makes them look more realistic. My top tip would be to start with a punched circle of card as your base, then build up the flower, petal by petal, layer by layer.

We made the card and gift purse, together with a bookmark (but I can't find mine), but had some time left, so we made some more flowers to put on other projects. The last picture shows what some of us came up with, using the same ink, stamp and punch, pretty!

Several of my ladies now have either the stamp set, punch or both, I can't wait to see what creations they come up with!

I was stalking the US demo's sites during their convention and found some gorgeous roses made with the punch, scroll down to my last post to see what I came up with.

Thanks for looking,
Kathy x


Tuesday 16 August 2011

Cake Box


I loved making this project, it looks quite complicated, but I cheated with a Sizzix die, sorry about that!

I started with a Sizzix die that makes the cake box. I covered the side with Early Espresso CS put through my crimper. This hides the score lines made by the die. The box is made from Mat Board as the gift inside is heavy (Glass tealight holder and scented tealights).

To the top I added a rose made using the largest petal on the Blossom Petals punch. I started with a punched circle as my base then punched out lots (about 15) large petals. I sponge daubed them all with Baja Breeze ink, then shaped them with a bone folder.

My first layer was 3 petals in a triangle, then another 3 overlaping the first. I then repeated this, shaping the petals upwards to get height. The centre was the tricky part, I rolled one petal to give me a centre, then wrapped one petal around it, then another until I had a good sized centre. At this point I cut some of the base of the centre as it was too tall. Finally I used some silicone adhesive to the centre of the base layers to sit the centre in.

I hope my directions made sense, maybe I'll have to do a tutorial (that'll be a first), so you get a better idea. It would be great if you had a go and please let me know how you get on, I'd love to see your creations.

Thanks for looking,
Kathy x


Monday 15 August 2011

Fun Flowers Team Swap

Another blurry card, what am I like!

Anyway, this was my swap at the last team meeting, I kept it simple as I was very naughty and left it until the last minute!

The colour combination is from my trusty colour coach - Concord Crush, Pear Pizzazz and Peach Parfait.

I started with some In Colour DSP (Hostess Level 1), die cut the flowers, punched a border and added some ribbon. The flower centre is a button made with the Sweet Buttons embosslit.

If I'd had more time (and been a good girl) I'd probably have embossed the top of the card base and sponged the flowers. Never mind, I promise to try harder next time!

Thanks for looking,
Kathy x


Saturday 13 August 2011

Scallop Envelope Purse


Sorry about the blurry picture, but I'm sure you get the drift of this little bag.

This was made using 2 Scallop Envelopes with the bottom flap cut down to the same width as the sides. Punch out the handle with the smallest oval punch then a little Sticky Strip and it's done!

I decorated it with some Greenhouse Gala DSP, die cut a tag, punched a large oval then added leaves and flower. I think this would make a lovely wedding favour.

Thanks for looking,
Kathy x


Thursday 11 August 2011

Sweet and Sour Cards


After the last team training event (thanks for hosting it Steph), I was well and truly inspired by Jayne's swap. It was gorgeous and she told us all how to make one. It sounded simple but I wanted to give it a go.

So the next day, as soon as Hubby was watching the Grand Prix and Ben was playing Star Wars, I sneaked into my cupboard to try and create one for myself. Here are the 2 cards I created and they were a lot easier to make than I thought they'd be.

I started off with the stunning Sweet and Sour DSP. Rose Red and Pumpkin Pie is not a colour combo I'd have thought of, but it works!

Jayne is going to be my room buddy at convention this year (can't wait) and I can tell we are going to have such a ball! She's so lovely and super talented, better get my thinking cap on for convention swaps as we only have 3 months to go (did I tell you I can't wait?).

Take care,
Kathy x


Tuesday 9 August 2011

Summer Splash Swap

At team training we like to swap ideas, so we make a stack of card fronts to swap with each other. This swap was male themed so I came up with a fun surfing card and paperclip bookmark.

The surfboards and sealife were inked using Stampin' Write markers to get the different colours.

A perfect card for where I live, only 20 miles from Newquay (surfing capital of the UK). I won't mention what else Newquay is famous for, but that's why I'm twenty miles away!!

Thanks for looking,
Kathy x

Sunday 7 August 2011

Strength and Hope Workshop


I love this set for 2 reasons, the first is that Strength and Hope has some lovely images, the second is that Stampin' Up! will donate £1 to the Breast Cancer Research Foundation with every set sold.

I first stamped each image onto some Shimmery White card stock using a differnt ink (Pretty in Pink, Rich Razzleberry, Early Espresso and Frost White Shimmer Paint) I then punched out loads of squares.

I repeated the process using Pretty in Pink and Rich Razzleberry card.

When my ladies arrived they made a patchwork of the squares, die cutting it using the Tope Note then embossing it with the Square Lattice embossing folder. A crumpled flower and stamped butterfly were the embellishments.

The second card is a Tope Note easel, simple to make and very effective.

Finally we made the Top Note bag, showing just how versatile that die is, love it!

Thanks for looking,
Kathy x.

Friday 5 August 2011

Springtime Vintage Workshop


The cards were inspired by fellow Stampin' Up Demonstrator Lisa (check out her blog on the left). She very kindly showed us how to make them at one of Abi's team training events. I love going to team training, we have so much fun, while sharing inspiration and chocolate!

While Lisa used Elegant Soiree DSP (love that paper), I decided to use the Springtime Vintage, teamed with Pocket Silhouettes stamp set.

We also made the cute box using the fantastic Top Note die. I got the instructions on how to make the box while blog hopping one night, but now I can't find the blog to give credit where it's due! So if you know who it was, please let me know so I can say a proper thank you to her.

Thanks for looking,
Kathy x