Saturday, 30 April 2011

Springtime Vintage #2

Another great pattern from the Springtime Vintage DSP, this time showing some more of the colours that make up this great set. I used River Rock as my card base, together with Not Quite Navy.

Do you like the flowers? They are a couple of them from the Sizzix Fun Flowers die. Be prepared for Fun Flowers to get everywhere! The centre is a card button I made using the Sweet Buttons Embosslit die. We no longer have to pay a fortune to send a card in the post with buttons, use card ones instead!

More cards using fab items from the mini coming soon!

Take care,
Kathy. x

Thursday, 28 April 2011

Build a Blossom #1

As you might have guessed by now, I bought quite a lot from the new mini catalogue! Not quite everything, but a lot!!

One of the things Stampin' Up! does brilliantly is matching stamps and punches and here's a lovely set called Build a Blossom with Blossom Petals punch. These stamps make the most gorgeous flowers a petal at a time.

The flower I created here is very large so I decided from the start that there would only be part of the flower showing, and I love how it turned out!

Thanks for looking,
Kathy. x

Tuesday, 26 April 2011

Team Swap March 2011

This is the card front I made for Abi's team training swap back in March. I decided tobase the card around the Springtime Vintage DSP as the mini was coming out the next month. Just a strip of it was used, along with a scallop border in Rose red. The Scallop Circle was put throught the Square Lattice embossing folder, before cutting in half. I then finished the card by adding a greeting to a Four Frame panel.

Thanks for looking,
Kathy. x

Sunday, 24 April 2011

Elegant Bouquet & Baja Breeze

This card might look complicated but, thanks to the Big Shot, is super quick to make!

I started off by embossing the base card with the Elegant Bouquet embossing folder, then adding Glass Glitter in Baja Breeze to the flower centres with Tombow Glue. I then set the card aside to dry.

Next I cut a large butterfly using the Beautiful Wings Embosslit (keep the smaller ones for other projects) and sponge daubed it with ink to bring out the detail.

I then made a panel using one of the Four Frames stamps and the Decorative Label punch. An oval greeting was added on top.

Once the glue was dry I assembled the card and finished it off with a Baja Breeze Seam Binding Ribbon bow.

Take care,
Kathy. x

Saturday, 23 April 2011

Kathy's Birthday Gifts 2011


I made these gifts and card for my work colleague, Kathy, whose birthday was last month.

She has loved my jewelery before so I made her a matching earring and necklace set. I first punched out circles of Elegant Soiree DSP and adhered them to Tim Holtz Faceted Charms using Crystal Effects, then used Crystal Effects again to seal in the paper. The necklace "chain" was Baja Breeze Seam Binding ribbon which is so lovely. I put the jewelery inside a Pillow Box which I made out of Vellum Card and embossed with the Elegant Flowers Embossing Folder, the embossing was inked using an Aqua Painter and I just had to add some more of that gorgeous ribbon to finish it!

The card used some more of the DSP, together with a Four Frames panel (sorry I just can't not use that set!!)
The last gift was a MINI Milk Carton filled with mini eggs as no birthday should be without chocolate!

Kathy loved them, just as much as I loved creatingthem.

Take care,
Kathy. x

Friday, 22 April 2011

Spring Workshop


 Hi there!

These were the 2 projects we made in the Spring Workshop last week. We loved making the 3D daffodils using the Fun Flowers die, but I think my favourite was the little bird house complete with cute owl.

When I found out we were (finally) getting the owl punch I just couldn't wait, he's so super cute!
I think some of my ladies have fallen for him too as they can't wait for me to place my next order (which will be soon!) The great thing about these boxes is the mini clip holds to roof on and it doesn't ruin the box to get the goodies out. But if you do want to seal them in, it's easy enough with a little bit of Sticky Strip.

Thanks for looking,
Kathy. x

Thursday, 21 April 2011

Plane & Simple #1


I always struggle with masculine cards so when Stampin' Up! brought this set out in their mini catalogue I had to have it! I'm planning for a demo at the end of the month for around twenty people and this is my first design, it'll get tweeked a bit for the night and I need to organise a 3-D item to make as well. Any suggestions in keeping with the male theme?

I kept it simple and let the stamps do the work. The border stamp creates the side panel, to which I added a scallop border. I then simply stamped the plane, punched the corners and added one of the greetings. When the card base is such a dark colour I like to add an insert and I stamped the goggles in one corner.

The colour combination was Early Espresso, Soft Suede and Very Vanilla.

I think I'll try a little distressing, maybe some texture and adding a contrasting colour to my next attempts. Once I'm happy with the projects I'll be making up the 20 kits, so that should keep me out of mischief for a while!

Take care,
Kathy. x

Wednesday, 20 April 2011

Beautiful Butterflies Workshop


My ladies will be making these projects this week, plus another but I haven't decided what that will be yet!!

The card shows just how lovely the Elegant Flowers embossing folder is, I've only added a few Beautiful Wings embosslet butterflies and coloured in the flower centres. The Four Frames has come out again, I just can't leave it alone!

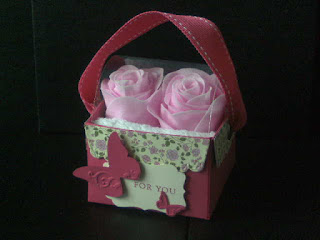
The box was made from the Scallop Envelope die, cut 4 envelopes and use Sticky Strip to stick them all together. There's a tutorial on You Tube here for a similar one, which is where I got the idea from. I've used some of the gorgeous Springtime Vintage DSP for the flaps for added interest and finished off with some more butterflies.

The box holds a nice soft flannel and 2 bathing roses which smell devine, and I added some acetate to the top to protect the contents.

I hope my ladies enjoy making these items, now I've just got to figure out what else for them to make!

Thanks for looking,
Kathy. x

P.S. I've now decided what the third project will be, but will hopefully post it tomorrow as I can't find the camera!

Tuesday, 19 April 2011

Easter 2011


Here's the card we made at the Easter workshop a couple of weeks ago, unfortunately the bunny sweet treat cups and  lamb chocolate holders have gone to School with Ben before I had the chance to take a picture. Note to self - take a picture before son gets hold of it!

You should have seen his classmates all huddled around him, hoping he'd pick them for one of his bunnies!! His also gave his teachers/assistants Mini Milk cartons filled with mini eggs, he knows how to keep them sweet!

The card was made using A Good Egg stamp set, love it, it's so cute! You might be thinking "When will I ever use that set, apart from at easter?", but look at the set again. There's some lovely background stamps with the spots & flowers. And how about the border, with your Stamp-a-ma-jig you could make long borders on your projects.

Thanks for looking,
Kathy. x

Monday, 18 April 2011

Springtime Vintage #1

I made this card when I received my pre-order from the new mini catalogue. As a demonstrator I get to see the new catalogues a month before my customers, and I am able to pre-order anything from the mini. The only problem with that is that there were so many gorgeous new items I didn't know what to order first!!

Luckily I already had the Scallop Circle die (and a Big Shot), but I did order the must-have item, the Beautiful Wings Embosslit die. Embosslits dies cut and emboss, this one has 5 gorgeous butterflies, some of which are tiny and make a great accent to a greeting panel, as I have done here.

The other items I just had to have were the Four Frames stamp set, with the matching punch. I teamed it with the Springtime Vintage DSP (lovely patterns and colours).

It was a simple card, you could make several in different colourway in no time as the Big Shot will cut several layers of the Scallop Circle at a time, and a few turns of the handle with scraps of card will churn out loads of butterflies.

Thanks for looking,
Kathy. x

Sunday, 17 April 2011

Greenhouse Gala Birthday

We had a workshop a few weeks ago where we used some of the lovely Greenhouse Gala DSP, unfortunately I gave away most of the items before taking pictures, so here's the only one left!

We has made vellum Pillow boxes, with some DSP wrapped around, and inside I put some keyrings I'd made using DSP and Crystal Effects on Tim Holts Fragments Charms. We also made a card using the DSP and the matching Ornate Flowers stamp set, which I later stamped "Mum" on to give as Mother's day cards!

This card was nice and simple, and shows how the DSP has patterns suitable for both ladies & men.

Take Care,
Kathy. x

Saturday, 16 April 2011

Baja Breeze Workshop


This workshop was held last month, sorry it's taken this long to show what we made.


When I first saw Baja Breeze, it was my favourite, and still is! We used some retired foiled DSP and brayered ink all over it. The vase template was used to wrap the vase (although when printing it from the template it came out smaller, so add a little depending on what printer you have.

Flowers were punched out using the Boho Blossoms punch and layered up, pearls were added to the centres. The vase was then sprayed with a gloss varnish to make it waterproof, you'll need a few layers, leaving drying time in between.

We then made a gift box to hold the vase in, decorating the top to match the vase. Finally a matching card, using one of my favourite stamp sets, Just Believe. A knot of Baja Breeze Seam Binding Ribbon finishes it off nicely.

Thanks for looking,
Kathy. x

Friday, 15 April 2011

Abi's Birthday 2011

Sorry it's been such a long time since I've updated my blog, but life & Blogger have been getting in the way lately. Every time I've had five minutes to update, Blogger hasn't been letting me in.

I've got loads of projects to show you, so if Blogger lets me upload all my photos, you'll have loads to see during the next couple of weeks.

My first offering was made to celebrate my Stampin' Up! Mummy's birthday. Abi is (lots) younger than me but her downline like to call her Mum!!

We share a love of chocolate so I bought a cup of Galaxy chocolate that you just heat in the microwave, they are super yummy (I had to try one or two just to make sure) and added a couple of bars of Galaxy Bubbles, they too are delicious!! lol

I made a simple open top box to hold them, added a piece of floristry film, gathered the ends up and used some retired spotty ribbon to tie it up. The outside of the box was decorated with some Vintage Vogue flowers with pearl centres.

The matching card has a Top Note die cut panel and the greeting panel is the new Four Frames stamp punched out using the matching Decorative Label punch. The top of the card base was stamped using the Very Vintage roller, I didn't want a clean image so I rolled it back and forth a few times.

The colour combination was Soft Suede, Crumb Cake & Pretty in Pink. Hope you enjoyed it, and had a lovely day Abi.

Take Care,
Kathy.x